Welcome to the DoD AKN User Guide!
Throughout this page, you will find helpful tips to guide you as you explore and utilize the Avian Knowledge Network!
Choose your topic of interest from the links below.
Not finding the information you need here? Email the DoD AKN Program Team and DoDAKN@erdc.dren.mil
- Setting up an AKN Account
- How to Request Access to Projects
- Describing Field Methods and Sampling Design
- Creating AKN-Compatible Sampling Units
- Downloading Sampling Units
- Describing Sampling Protocol Definition for AKN-Compatible Projects
- How to Add an Existing AKN Protocol to Your Project
- AKN Roles and Access
- Data Entry – Entering Directly vs. Bulk Uploading Observation Data
- Data Sharing Levels and Use
- Downloading Your Data from Project Leader
- Downloading Warehouse Data from Multiple Projects
- How to Use the Data Catalog
- How to Use the Observations Map
- How to Use the Rail Tool
- Using the Analyst Tool
Keep in mind- this guidance will be updated periodically to ensure the most up-to-date guidance is represented, so check back often for updates!
Getting Started with the AKN
Setting up an AKN Account
Note: You need a project code to create an AKN account. If you are registering for a training class, use the account “DOD_DEMO.”
- To register to become an AKN user follow the steps on the New User page on the DoD AKN portal. You can contact the AKN staff with this or other questions by emailing the help desk at support@pointbluehelp.zendesk.com.
- Complete all the steps on the form.
- You will receive an email from AKN (datasolutions@pointblue.org) notifying your account is ready to use along with a link to the log-in page where you will be asked to set up your log-in account. Once you are logged in, follow the instructions below to access the data.
How to Request Access to Projects
If you wish to access another project, go to the Project Request Page and enter another project code. An email request will be sent to a project leader, who can grant permission for access.
Describing Field Methods and Sampling Design
Thoroughly describing field methods prior to submitting data to the Avian Knowledge Network ensures that we maintain a rigorous standard of high-quality data that can be used for analysis and decision support tools. The following standards for describing field methods are designed as guidance for biologists submitting data to the AKN using a protocol that has not already been described within the AKN. Details about field methods will be incorporated into the AKN Catalog entry and will be accessible to AKN users that have access to the data.
Below is a questionnaire to use to capture the methodological metadata necessary to understand the methods and assumptions behind your data. You may wish to store metadata like this in your Project Data Catalog. More information about Metadata can be found HERE.
AKN Questionnaire for New Projects
- Please provide a short summary of the scope of your project. What are the objectives/questions for your project?
- If you know the AKN Sampling Protocol Definition(s) that you will use for your data entry, please provide that information here.
- Have you identified Sampling Protocol Definition(s) that are close to your field methodologies, but don’t fit exactly? If so, please provide that information here (If you don’t know, leave this blank).
- Briefly describe your field methods. List the citation of the field methodologies used and a URL link if available. Provide your written field protocol or standard operating procedure if it is not available online. Attach a copy of your field form.
- How do you select your sampling locations? Briefly describe your study design.
- Are you surveying for specific species, if so what? Please specify whether these are the only species you record on your surveys or whether you record all species you observe.
- What is the date range (month and years) your surveys took/or will take place?
Creating AKN-Compatible Sampling Units
Background
- Sampling Units are field locations where research or a survey is conducted and samples (observations) are collected (i.e. location data).
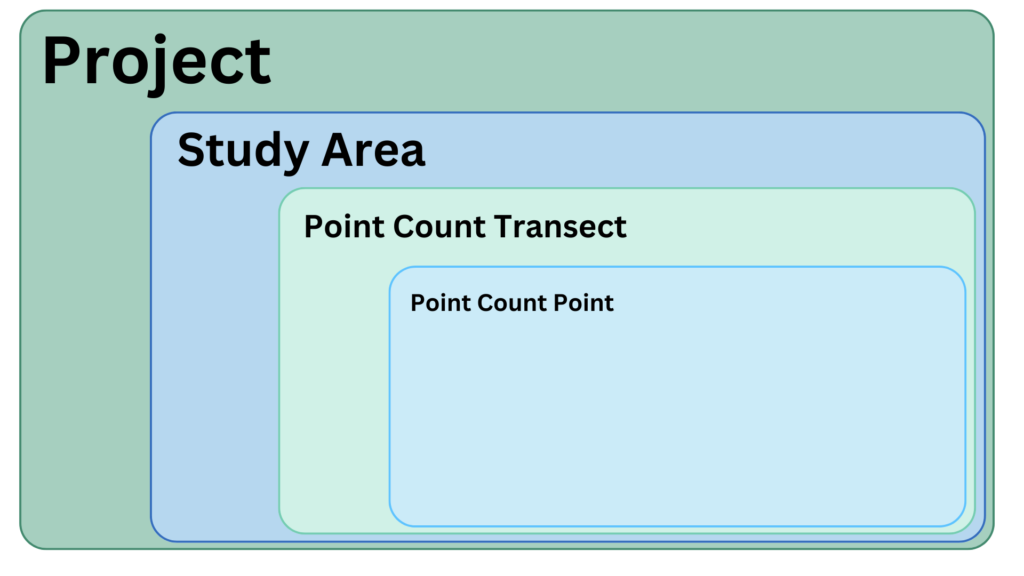
- Sampling Units are structured in a hierarchy and always start with a Study Area. A Study Area is where one or more types of sampling events take place.
- Study Areas can contain multiple types of Sampling Units, including Point Count Transects, Area Search Plots, Linear Transects, and many other types of Sampling Units, as well as other Study Areas. NOTE: Study Areas are often thought of as geographic spaces, however in the AKN, “Study Areas” can be used to group sampling events by area, data type, survey project, etc. (e.g., Project – Fort Carson, Study Area – Breeding Bird Survey Point Counts). Feel free to reach out to the DoD AKN team for questions or advice on how to organize your Sampling Units!
- Every Sampling Unit in the hierarchy has a Short Name, a Long Name, a Type (e.g., Point Count Point), and an optional GIS feature that can describe the location. The combination of Short Name and Long Name must be unique within your entire Project.
- The Short Name will be seen the most throughout the tools and is the shorthand name for a sampling location. The Long Name can be the same as the Short Name or can be made more descriptive if that is useful.
Options for Uploading Sampling Units into the AKN
Option 1: Providing Sampling Units in AKN Format ready for bulk uploading by AKN support staff
Option 2: Uploading sampling unit through Project Leader
Option 3: Uploading Sampling Units Through the Bulk Uploading Tool
Option 1: Providing Sampling Units in AKN Format ready for bulk uploading by AKN support staff
If you do not have an AKN account or do not have Project Leader status, AKN support staff can load formatted sampling unit configurations for you. A step-by-step guide to preparing your data can be found here:
Step 1: Provide a Spreadsheet with Locations and Sampling Unit Hierarchy
See Sampling Unit Bulk Upload Template Excel
- There will be columns to populate the study area name so the tool knows where to put the sampling units, you can choose to place all of your sampling units into one study area or create multiple, depending on your project.
- Build out your sampling unit hierarchy nested appropriately for the AKN. For example, if you are uploading point counts locations they should be nested as follows:
- What makes a transect? Groups of points that are sampled together (i.e., that are not independent of each other) should be nested together under a transect. If points are individually sampled and not as a whole route then they should be set up where each point is nested under a unique transect (i.e., single-point transects).
Step 2: Create a shapefile or KML file with sampling units
- The geospatial file should include only data for locations for where surveys look place, i.e. points for point counts, polygons for area search plots, or lines for linear transects.
- Must use a WGS-84 geographic coordinate system (EPSG:4326)
- Attribute table should contain:
- Sampling Unit Short Name
- Sampling Unit Long Name
- Latitude
- Longitude
Option 2: Uploading sampling units through Project Leader
You must have an AKN account and Project Leader access to upload sampling units. The current Project Leader can assist you in getting access, or you can send an email to support@pointbluehelp.zendesk.com to get assistance if needed. A step-by-step guide to use Project Leader to upload sampling units can be found below:
- To upload sampling units through the Project Leader application, first log in.
- Under Sampling Units select Create and Manage.
- Select your Project.
- You can either upload sampling units one at a time through the “Online Form” or multiple sampling units at once with the same sampling unit type (e.g. study area or point count transect) with a zipped shapefile or KML file. If you are uploading more than a few it is suggested to do this with a shapefile or KML, note that they will need to use the WGS-84 geographic coordinate system (EPSG:4326). Click on the sampling unit where you would like to nest more sampling units under, it will highlight that one in yellow, if there are no sampling units in your project you will select the project name.
- Select how you will be uploading sampling units (e.g. online form, SHP file) and select the sampling type you will first upload and click “enter”. If using the online form, enter the name of the sampling unit and you can use the “Digitize Location” tool to enter a location. If uploading locations through a shapefile select the sampling type and then on the next page those locations.
- Continue this process by building out your sampling unit hierarchy and uploading different types of sampling units. For example, if you are uploading point counts locations they should be nested as follows:

Option 3: Uploading Sampling Units Through the Bulk Uploading Tool
You must have an AKN account to use the Bulk Uploading tool and Project Leader access to the Project you wish to upload sampling units to.
Go to the Bulk Uploader, select your project (you will only see projects that you have access to).
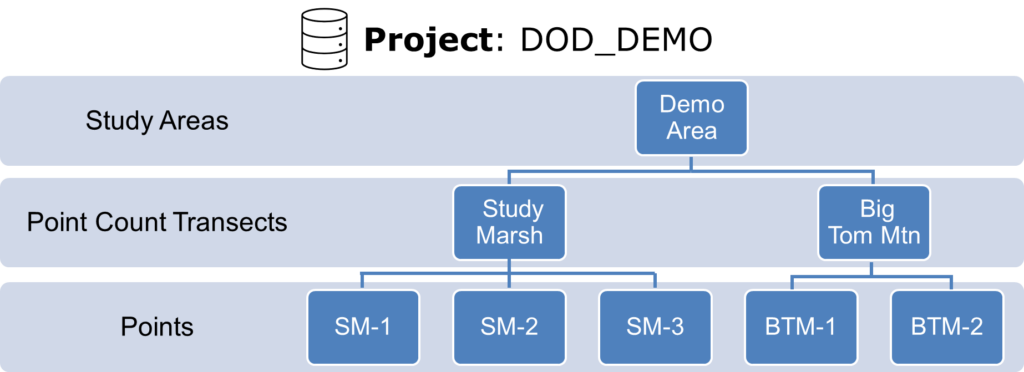
Sampling units are defined in a hierarchy, with each level having 2 names: a short name (a brief, upper case identifier with no spaces) and a long name (a longer, descriptive name that can be the same as short name or contain more detail). The combination of short name and long name must be unique in your project. The standard hierarchy for Point Count is Study Area → Point Count Transect → Point Count Point. Study areas are how you organize your data for analysis or management. Some projects simply create a single study area the entire project. There must be at least one study area in every project. Transects are collections of points that get analyzed as statistical replicates.
To use the tool to upload Point Count Sampling Units:
- Choose the Add Sampling Units tab and select “Point Count”.
- Populate a csv file with the following fields. A template is available for download below and can also be downloaded directly from the Bulk Uploader tool by selecting “Get a blank Template to Fill out.”
- Study Area Short Name (short name, required, no spaces)
- Study Area Name
- a longer, descriptive name that can be the same as short name or contain more detail
- not required but will ensure your sampling unit loads properly
- must be unique to the project when in combination with the short name
- Point Count Transect Short Name (short name, required, no spaces)
- Point Count Transect Name
- a longer, descriptive name that can be the same as short name or contain more detail
- not required but will ensure your sampling unit loads properly
- must be unique to the project when in combination with the short name
- Point Count Point Short Name (short name, required, no spaces)
- Point Count Point Name
- a longer, descriptive name that can be the same as short name or contain more detail
- not required but will ensure your sampling unit loads properly
- must be unique to the project when in combination with the short name
- Latitude (in decimal degrees, WGS 84 datum)
- Longitude (in decimal degrees, WGS 84 datum)
- Choose the csv file to upload; after successfully selecting a file, the name of the file will appear on the screen.
- If you have a GIS file ready that defines the area of your sampling unit, that can be uploaded as well. This can also be added later.
- Click the Process Sampling Units button. Errors, successes, and information about the batch run will be shown.
If there were problems with the file, they will be identified in the error messaging.
To verify that the points uploaded correctly, go to Project Leaders, Sampling Units > Download, select the project, and open up the tree control – this should reflect the organization you just created. If you added latitude / longitude values, select all and download GIS data to either ESRI Shape file or Google Earth (KML) and open the file in a GIS tool to make sure they are located and labeled correctly.
To review previous batch loads for your project, select Batches, then click on an individual batch to expand the details.
Sampling Unit Bulk Upload Templates
Following the guidance in Creating AKN Compatible Sampling Units, you can download and fill out submit this Sampling Unit Bulk Upload Template with the names and locations of your sampling units using the following templates appropriate for your sampling protocol.
Downloading Sampling Units
- Go to the DoD AKN Portal (dodakn.org). Click on the “Manage Data Now” button on the home screen. Scroll down to the heading “Get Data In” and click on the Biologists Application (https://data.pointblue.org/science/biologists/). Log in if needed.
- Select the project on the left DOD_DEMO
- Click on “Download Locations to GPS, GIS and more” in the list on the right.
- A new screen will open in the Project Leader application (it may prompt you to log in again). On the left side, you’ll see a list of service branches. Click the “+” icon next to your branch to see the list of transects nested underneath.
- Click on the box next to the transects you wish to download. It will automatically check the boxes for all the sampling units nested underneath the transects you select.
- On the right hand side, you’ll notice several options for what type of file you wish to download your sampling units in. Try clicking “Google Earth file” to download a .kml file. This is a format that can be uploaded to most GPS units. Alternatively, if you just want to see a list of your points and their coordinates, click on the “CSV (Excel) button to download a spreadsheet with your information.
Describing Sampling Protocol Definition for AKN-Compatible Projects
Background
The first step in creating a new sampling protocol in the AKN is to define what type of sampling protocol your data are structured in. The main types of protocols in the AKN system include:
Point Count – A stationary survey conducted at specific points that are part of a collection (or transect) of points for a predetermined amount of time at each point within a specified distance, exhaustively collecting species that are in your list of survey species (we assume all species not recorded were absent), and individual animals counted once.
Area Search – Survey within a predefined boundary for a recorded amount of time, exhaustively collecting all survey species that are detected in that boundary, and individual animals counted once.
Linear Transect – Survey while moving along a path on foot or by vehicle (boat, ship, plane, other) for a recorded amount of time, exhaustively collecting all survey species, and individual animals counted once.

Secretive Marshbird – Point count with tape playback where focal species are recorded every minute they are detected in a predetermined sequence of calls played in a fixed amount of time. Other non-focal species may also be collected using Point Count methods.
Finding the Right Protocol for Your Data
Step 1: Check existing Sampling Protocols in the AKN
- Go to the Protocol Search Portal. You’ll have to log in as a Project Leader to use this portal. If you do not have an AKN account, you can either create one HERE or if you will not be making an AKN account, you can skip to Step 2.
- If you do not have an AKN account, you can still browse available Sampling Protocol Definitions using the Biologist Protocol Search Tool.
- Use the drop-down menus and filter features to search through existing Sampling Protocols in the AKN to see if the field protocol you are using fits into an existing Sampling Protocol in the AKN.
- If the protocol you are using closely matches one of the existing AKN Sampling Protocols but needs a few things adjusted, it may be useful to use that Sampling Protocol as a starting point for describing your Sampling Protocol Definition in Step 2.
Step 2: Fill out a Sampling Protocol Definition spreadsheet to describe each of the fields in your dataset
- Download and use the DoD AKN Standards: Generic Sampling Protocol Definition Template to provide the field names, descriptions, and acceptable domain values for each field in the sampling protocols on the Field Description tab.
- Specify whether the field is a Sampling Event field or an Observation field.
- Sampling Event fields are fields that describe the entire survey (e.g., date, observer, weather). Many of these are ultimately stored in the AKN in “site condition” tables.
- Observation Event fields are fields that pertain to unique observations within the survey (e.g., detection time, species, distance).
- An example is provided in the Sampling Protocol Definition Template.
How to Add an Existing Protocol to Your Project:
Step 1: In the Project Leader application, under “Project Definition” (see tabs at the top of the page) click on “Protocols Used,” and then select your Project
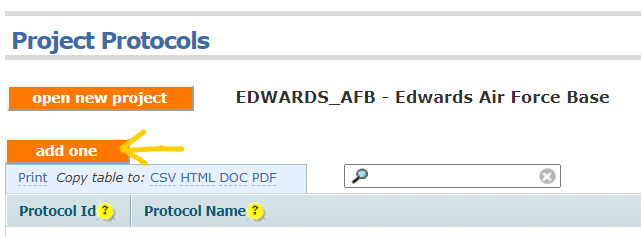
Step 2: You will then see a list of all the protocols that are currently in your Project. To add an additional protocol, click the “add one” button.
Step 3: Find the Protocol type and name on the list that you would like to add, click to highlight it, and click “save.” You will now see this Protocol on the list of available Protocols when you enter data in the Biologist Application.
AKN Roles and Access Levels
Biologist
Users granted access to the Biologist Application are able to enter, edit, and review field observations.
Project Leader
Users granted access to the Project Leader Application are able to manage projects through creating and managing sampling units, assigning researchers and protocols, assigning Biologist role to other people, manage data sharing levels, and download data and metadata. A Project Leader will also automatically have access to the Biologist and Analyst applications.
Data Entry
Here we describe two different methods to enter or upload data into the AKN:
Entering Data Directly Using Biologist
- Go to the Biologist application
- Select the project which you want to enter data for.
- Under “Project Observation Type” select the type of data you are entering.
- Select the sampling unit you are entering data for (e.g. the point count transect or area search plot). If there is a long list of sampling units, use “CTRL-F” to open the search bar and type in the sampling unit name to find it quickly.
- Use the drop-down under “Observation protocol” to select the protocol you are using, if there are multiple and you are unsure check with a Project Leader as the protocol selected will change which data you can enter.
- There may or may not be a site condition protocol to select as well.
- Click Start.
- The data entry will vary depending on the protocol used but you will want to fill out each field and click “Save All”
- Fill out the general information of date when the survey took place, start and end time, visit number (leave as None for species checklist), observer’s name, # of other observers, data sharing should say Raw at this point. Note some of these fields are depended on the data type you are working with.
- For point count protocols, it will ask you to select the point that you surveyed. To select all, check the top box. Entered the start time for each point, end times should automatically populate based on the protocol selected.
- Enter the site condition fields, if applicable, at the top of the page
- Under Observations, Point, select a point from the drop-down menu.
- Time should automatically populate with the point’s start time. It will update if you select a different time bin from the “Time Bin” field.
- Enter species codes using 4-letter codes. If you are unsure of a species code, use the “species lookup” tool linked at the top of the page
- The database is structured to flag errors, if errors pop up edit the referenced data and try to save again, once all errors are fixed the data can be saved.
- After the data are saved you will be taken to the “Proofing page”, here you should review what you entered. Any field with a small vertical blue line can be edited right there, just double click, edit the field, and it will automatically update. Once the data have been reviewed select “Proofing Complete”.
- You can now move onto the next location you wish to enter data for. When you are ready to enter your next route or checklist you can go back by selecting Location on the top of the screen, this will take you back to the list of routes and you will start the process over from step 4.
Basic Data Entry Guidelines
- Enter all data in capital letters, using the “Caps Lock” function on the keyboard.
- Enter all data exactly as they appear on the field form.
- You must be familiar enough with the Data Entry Form to know which fields are required and which are permitted to be blank. If you are not certain, review this with the Project Lead prior to data entry. Some fields are intentionally left blank and should be left blank during data entry.
- Time fields are 24-hour time.
- “Tab” is an especially useful shortcut key to move forward from one field to the next.
- When entering data, try to leave enough time to complete a block of data (e.g., a point count route). Do not partially enter a point count route, wait until you have entered the entire route to click “Save All”
Entering Data Directly Using the Bulk Uploader Tool
Option 1: Providing data in AKN Format ready for bulk uploading by AKN support staff
Option 2: Format and Bulk Upload Data as Project Leader
Option 1: Providing data in AKN Format ready for bulk uploading by AKN support staff
Step 1: Prepare appropriate metadata tables
- Before observation data can be uploaded, a sampling protocol definition should be established for the data structure and sampling units should be uploaded into the project. Use “DoD AKN Guidance: Creating AKN Compatible Sampling Units” and “DoD AKN Guidance: Describing Sampling Protocol Definition” to complete these steps before preparing observation data.
- Once your Sampling Protocol Definition has been created AKN staff will provide a blank CSV template for how your data should be structured.
- A separate CSV should be submitted with the researchers names, first name should be in column A and last name should be in column B. A CSV template can be provided as well.
Step 2: Proof and format your data
- In your data management program (e.g., Access), make sure to identify and clean up any errors prior to submitting your data. Make sure that each value recorded matches the domains outlined in the Sampling Protocol Definition, an error will be triggered if values outside of the sampling definition are used and the data will not upload.
- A template will be provided that all clean observation and event data should be formatted to
- Clean up common mistakes (e.g. text entered into numeric fields).
- All dates and times should be in a single format.
- Observer names should match the exact spelling in the list submitted and should all be in the same format (e.g. first, last).
- Make sure the sampling unit names are written exactly the same as the sampling unit names uploaded.
Option 2: Format and bulk upload data AS PROJECT LEADER
You must have an AKN account and Project Leader access to bulk upload data.
Step 1: Prepare appropriate metadata tables
- Before observation data can be uploaded a sampling protocol definition should be established for the data structure and sampling units must be uploaded into the project. Use “DoD AKN Standards: Format for AKN Compatible Sampling Units” and “DoD AKN Guidance: Describing Sampling Protocol Definition” to complete these steps before preparing observation data.
- You will also need to upload the researchers names, this includes any name listed as an observer in the database.
- Log into the Bulk Uploading tool here https://data.pointblue.org/science/projectmanager/bulk_uploader
- Select your project in the drop-down menu and click “Add Researcher”
- Select “Get a blank template to fill out”, download it then populate and save the CSV
- Select “Bulk upload this datafile”, choose your saves CSV, and select “Process Researchers”
- If errors pop up, edit your CSV appropriately and try again
Step 2: Proof and format your data
- Make sure that each value recorded matches the domains outlined in the Sampling Protocol Definition, if values outside of the sampling definition are used they will error and not upload.
- You will need to format your dataset into a template customized for the sampling protocol definitions used in your project. All data, both event and observation will be uploaded in a single CSV.
- Download the template in the Bulk Uploading tool under “Add Observations”, “Get a blank template to fill out”. There you will select your data type and sampling protocols used and download the CSV.
- Structure your dataset to match this template and carefully proof the dataset.
- Make sure the sampling unit names are written exactly the same as the sampling unit names uploaded
- Observer names should match the exact spelling in the CSV of uploaded researchers and should all be in the same format (e.g. first, last).
Step 3: Upload data
- The Bulk Uploader tool uses YAML language to map the data, you will need to download and save the YAML script specific to the sampling protocol you are using. In the tool under, “Add Observations”, “Get Blank Template”, make sure to select the correct sampling protocols then select “Download YAML Template”. As long as all of the field names match the data template this YAML script should not need to be edited.
- Select “Bulk Upload Dataset”, select the populated data template and the YAML script you just downloaded and select “Process Observations”.
- It is possible that some data will upload and some will error, if an error message comes up fix the associated data and try to reprocess.
Data Sharing Levels and Use
How to Set Data Sharing Levels
DATA SHARING LEVELS
It is the intention of the AKN that data be shared whenever possible, while carefully considering the tradeoffs between widespread distribution of datasets, the need to ensure data quality and validity, the privacy rights of land owners, and the intentions of the Data Owner(s). AKN, therefore, offers the following data access levels and sharing options that specify which level of access is granted by Data Owners. These are applicable to each and every record in the network individually, so that different records may have different sharing levels.
The AKN encourages its partners to anticipate that most data collected will eventually become part of the public domain. We encourage Data Owners to share data 10 years old or older without restrictions (Level 5). However, the AKN ensures that their data and tools are secure and that access is controlled based on Data Owner intent.
The following are the Avian Knowledge Network’s Data Sharing Types:
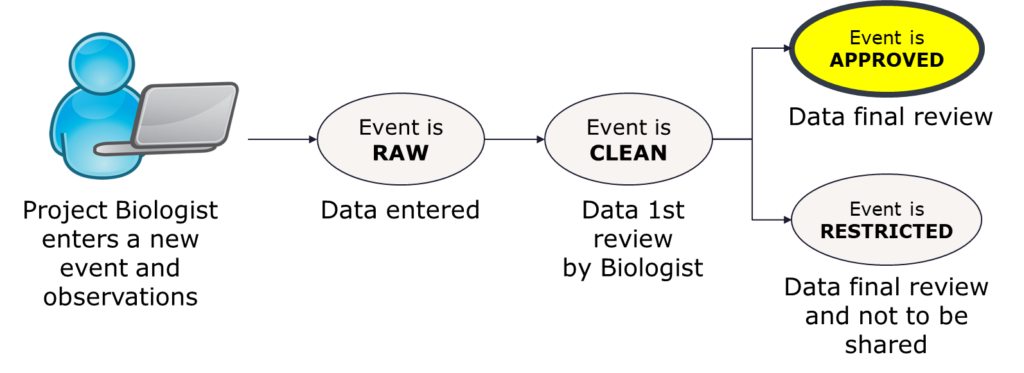
RAW
RAW data are those that are initially input into the AKN that have not been reviewed for accuracy. These data cannot be used in any analysis and are not available in the AKN Data Warehouse for download or the Data Catalog. Data are waiting for either Biologist or Project Leader approval to be elevated to CLEAN. Only the contributing institution has access to data at this level.
CLEAN
CLEAN data are those inputted into the AKN that have been reviewed for accuracy and accepted as valid. The data will be copied into the AKN Data Warehouse for download by those affiliated with the project via the Data Downloader. The data are also available for use by the AKN Analyst Tool. The data are waiting for Project Leader approval for elevation to higher sharing levels. Only project members have access to data at this level.
APPROVED
APPROVED data are available for use by the contributing institution (those associated with a project at the Analyst, Biologist, and Project Leader roles). Data are copied into the AKN Data Warehouse for download by those affiliated with the project.
RESTRICTED
RESTRICTED data are for Projects where information about the Project associated with the data records is made available in the Data Catalog. However, information about restricted records is not shared with the Data Catalog or any other AKN tools. Only the contributing institution has access to data at this level.
Data published under one of the four Data Sharing Levels below are stored in the AKN’s primary data warehouses.
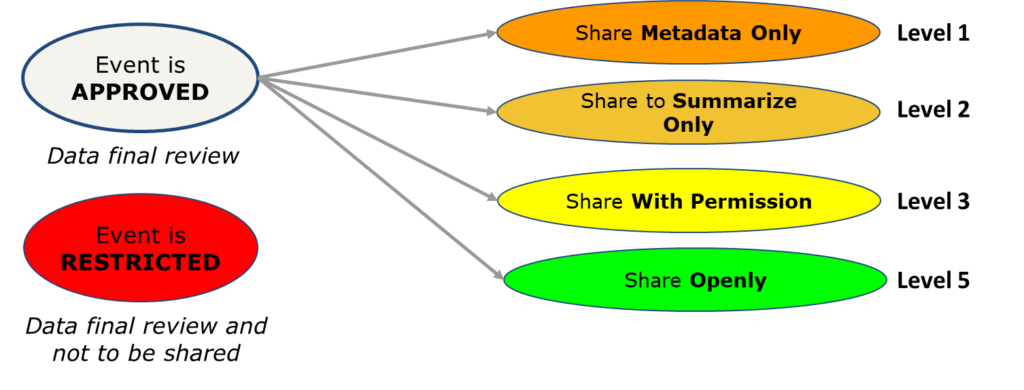
LEVEL 1 – Metadata Only
Metadata about Level 1 records are made available in the Data Catalog, including contact information, locations, survey methods, species surveyed. However, records are not used in any other AKN tools. Only project members have access to data at this level. [Not recommended for DoD data]
LEVEL 2 – Summarize Only
Level 2 inherits all Level 1 rules, plus allows the use of data as part of publically available visualizations and summaries without survey effort and specific count details.
LEVEL 3 – Share with Permission
Level 3 inherits all Level 2 rules, plus allows the use of full observation data and metadata detail to anyone that has a data sharing agreement with the data owner.
LEVEL 5 – Share Openly
Level 5 allows full observation data and metadata detail to anyone for use without the need for explicit permission from the data owner.
The AKN encourages its partners to anticipate that most data collected will eventually become part of the public domain. We encourage Data Owners to share data 10 years old or older without restrictions (Level 5). However, the AKN ensures that their data and tools are secure and that access is controlled based on Data Owner intent.
For DoD AKN users, the preferred recommended sharing level is Level 2. This sharing level slows for data to be utilized in AKN data visualization tools, however direct access to the raw data is restricted.
For full details on Data Sharing in the AKN, see the AKN Website Data Sharing page.
HOW TO SET DATA SHARING LEVELS
Project Leaders have the option to share data at multiple levels. Data sharing levels are set at the sampling event, so you can choose to have specific surveys shared openly and keep others more confidential. Once data is clean, unless there is a sensitive species or other issues that warrant keeping data restricted, we suggest most data should be shared at Level 2 and above. This will allow summaries of your data in the AKN to feed tools such as the Observations Map and the Rail Tool.
When you enter data and complete the proofing process, your data are automatically moved from RAW to CLEAN. After that, you must update Sharing Levels by going to the Set Data Sharing Levels tool in Project Leader.
To set data sharing levels:
- Navigate to the Project Leader Application. Go to the DoD AKN Portal. Click on the “Manage Data Now” button on the home screen. Scroll down to the heading “Get Data In” and click on the Project Leader Application. Log in, if needed.
- Under the “Field Observations” heading, click on “Set Data Sharing Levels”
- Use the drop-down box to select your project DOD_DEMO
- Under “Available Protocols” click on the protocol type for the data you wish to set levels.
- If necessary, use the date and search filters on the left hand side to find the events you want to change.
- Click on the events you wish to change. You can select multiple events by using CTRL+ Click.
- With your events highlighted, use the drop-down menu at the top to select a data sharing level.
- Click the “Set” button. You’ll notice that the sharing level has been changed on the events you highlighted.
- If you are satisfied, click on the “Save” button to update the database.
METADATA
Metadata are a critical component of data preservation. Metadata provide complete documentation of methods, location, and effort used in collecting the data. Metadata also document specific definitions for data fields and dictionaries for each field’s domain. Data sharing levels are also documented as part of a dataset’s metadata. Metadata are needed to ensure the data can be properly understood and their quality and potential usefulness assessed. Data for which there are no associated metadata have limited utility.
DATA USE AND TERMS
The AKN encourages and facilitates the ethical and courteous use of data among collaborators. All cooperators who contribute to and/or access data from the Avian Knowledge Network are required to explicitly agree to these data-sharing terms and policies.
The use of data, and the publication of results derived directly from those data, are the primary responsibility and privilege of the Data Owner. This privilege is extended to third parties as a contribution by the Data Owner. Data Owners should always be acknowledged in publications and reports.
Requests for the use of data should be made in writing (via letter or email). The written request should have clearly defined objectives, and should explicitly spell out the terms, conditions, and parameters of the data requested and how they will be used. Data Owners may set individual terms and conditions for allowable use of their data (e.g., acknowledgment, co‐authorship in publications) that may be specified in a Data Sharing Agreement. A suggested general guideline is that, when 20% or more of the data for a publication or report come from one Data Owner, that Owner should be given the opportunity for authorship on the publication or report.
Getting Data Out of the AKN
Data stored in the AKN can be downloaded in two ways, both of which require an AKN account:
Downloading Your Data From Project Leader
Project leaders can download the data in the AKN project at any time, no matter what sharing level it is assigned to. Data downloaded from Project Leader include the full dataset, not the smoothed data that is stored in the Data Warehouse, so it will include all extended fields, original distance bins, etc.
If you have Project Leader access, you may use the Project Leader application to retrieve data. The Project Leader application allows a user to download data from one project at a time. These data will include all fields described in the sampling protocol.
Click on Field Observations tab then on “Download”
Select the project you would like to download data for in the “Select your project” box, and then click on “enter”.
Under “1. Select Sampling units from the tree below”, select the sampling units you would like to download data for or click on the “Select All” box.
Under “2. Download observation data from selected Sampling Units into” you have the option to filter by date (year-month-day) or leave blank for all records
Scroll down to the type of data you would like to download (e.g., point count observations, area search observations) and click on CVS (excel) file.
Downloading Warehouse Data from Multiple Projects
The Data Downloader tool can be used by anyone with an AKN account and can be used to download any data that is stored in the Warehouse and accessible at Sharing Level 5.
The Data Downloader tool allows you to search for data based on specific criteria such as protocol, project name, species, date, or region. The data downloaded through the Data Downloader tool will only include core fields; it will not include any custom fields that have been created for the protocol. Instructions for using Data Downloader can be found here:
- Log into your AKN account at the Data Downloader tool.
- Select the observation type (e.g. Point Count or Area Search) from the tabs at the top. Then, filter for the data you wish to download. You’ll notice that you have several options:
- Protocols—if you know the AKN sampling protocol(s) that are relevant to your download. If not relevant, select “All Protocols”
- Date Range—You can either filter by a date range or select “All Dates”
- Species—You can select one or more species (select multiple species by holding control and clicking on each species name)
- Regions—To filter by region, first select a region type (for example, US States). Then select the region(s) to filter by. You can select multiple regions by holding control and clicking on each region name).
- Project—You have the option to download data from all the projects you are a project leader on, plus data from other projects that is shared at sharing level 5. You can select one or more projects to download data from here.
- Note that if you do not narrow down your search by using some filters, it will take a very long time to create a download file.
- Click “Search” and then “Download” to download a CSV of the filtered data
Exploring Data in the AKN
How to Use the Data Catalog
The Data Catalog allows you to search for available datasets in the AKN and find out information about them. The Data Catalog is also an excellent resource to document important metadata about your project for future researchers at your installation, but it is only as good as you make it! We will show you some examples of information that is helpful to include in a data catalog entry, such as citations, contact information, and field methodology.
- Navigate to the Data Catalog:
- From the DoD AKN Portal: Click on the “Manage Data Now” button on the home screen. Scroll down to the heading “Discover Data” and click on the Data Catalog.
- Let’s start by getting oriented to the Data Catalog:
- Click Datasets at the top of the screen. Many project databases have a data catalog entry.
- Click Groups at the top of the screen. These groups / organizations have tagged a collection of Datasets to them.
- Note the giant Search bar. You can search for Datasets by a variety of criteria.
- Click on “Datasets” at the top. In the search bar, type “KBO” and hit Enter. Click on the first in the list of results (KBO Aquatic Monitoring (KBOAQUATIC)). This example is fully filled out, including citations.
- Try searching for a species to find datasets.
- You can use the Search Bar in conjunction with the Map (Note the Map will not appear until you have searched for something) – click the pencil to zoom/pan on the map and draw a rectangle to search.
- To zoom in / out, click on the Plus/Minus icons in the upper left corner. You can also Double click the mouse to zoom.
- To pan, make sure your cursor looks like a hand, and click-hold the mouse and drag. If your mouse is a cross sign and you want to pan, just click anywhere in the map to reset so you can pan.
- To search by a rectangle, click the pencil icon in the upper right corner of the map (the cursor becomes a cross). Click and hold the mouse and drag to create the box. To change it, simply click the pencil icon and draw again. If you are happy with your rectangle, click the Apply button in the bottom right corner below the map.
How to Use the Observations Map
The Observations Map lets you explore survey locations and data from multiple sources (AKN, BBS, or eBird) and examine species occurrence and trends. Unlike the RAIL tool, this is not a modeled dataset, but actual observation data that has been set to Level 2 sharing and above.
- Navigate to the Observations Map.
- From the DoD AKN Portal: Click on the “Manage Data Now” button on the home screen. Scroll down to the heading “Explore Data” and click on the Observation Map.
- Let’s start by getting oriented to the Observations Map:
- To zoom in / out, click on the Plus/Minus icons in the upper left corner. You can also Double click the mouse to zoom.
- To pan, click-hold the mouse and drag.
- “Search by address” lets you zoom into a specific area by name. Type in a place name and click Go.
- Choose a species – the tool requires you to pick a specific species first. Pick one from the dropdown list, and you will see the Data Collections turn on.
- Choose a date range – use this if you want to further filter the search to be only within a range of months (say the breeding season), or leave as-is to give back all data.
- Choose a data collection – choose from the AKN (all from our data warehouses), eBird, and BBS collections. Dots will appear in colors showing where observations were made for that species in the area you’re looking at. Note that some of the larger collections (e.g., eBird) are broken into regional datasets for system performance.
- Click on a map dot – this will give you information about what was surveyed and observed at that location in the panel to the right.
- If a year is listed at the top, you can click on it to see a summary of that year.
- Avian Data Summary – for AKN or BBS data only, click on this link to get an Analyst report of species richness for this location. (Be patient letting this live analytics report run. You’ll see a twirling icon in the upper left corner while it is running.)
- Species – for AKN or BBS data only, click on a species link to get an Analyst report of phenology and species abundance. Again, be patient in letting this live analytics report run.
- Choose a map overlay – for visual appearance and area summary. Choose the type of summary you are interested in, and click in the specific area to summarize between the observation dots. You will get a summary of observations for that area in the right panel. Note, state summaries take several minutes to run and load.
How to Use the Rapid Avian Information Locator (RAIL) Tool
The RAIL tool is available without an AKN account. This is a good starting point for finding species information, including PIF population estimates, conservation status, and phenology for any location in the continental U.S. While not intended to provide final data for reports, it can help you find some general information about the species in a particular area and their conservation status.
Note about the data in the RAIL tool: The species lists you get in the tool are based on an analysis of data from the AKN at sharing level 2-5 along with other datasets, such as BBS and eBird. It is important to understand that the data presented here is modeled on a 10-km grid, so the species list won’t necessarily be exactly tied to the geographic boundary you have drawn—it may include more species than you would expect, or it may exclude species you know are there because they were not abundant in the datasets used for the analysis. Also note that all subspecies are grouped at the species level in this tool.
- Navigate to the Rapid Avian Information Locator (RAIL) tool.
- From the DoD AKN Portal: Click on the “Manage Data Now” button on the home screen. Scroll down to the heading “Make Decisions” and click on the RAIL tool.
- Let’s start by getting oriented to navigating the map and selecting in the RAIL Tool.
- To zoom in / out, click on the Plus/Minus icons at the top of the screen. You can also Double click the mouse to zoom in and Shift-Double click to zoom out.
- To pan, click-hold the mouse and drag.
- To change the underlying base map, click on either the Topo or Satellite options in the upper right corner.
- Go to location – you can type in an address or place name, hit Enter, and the map will zoom to that location.
- Select Area – this lets you draw a polygon on the map, ending that polygon entry by double clicking to close or by clicking again on the first point. As soon as the area is defined, the Get Results button becomes available.
- Use all available species – this lets you select specific species to query. The default is all available species, but you can type species names or codes into this box to query for a list of specific species. You can type in multiple species to create a custom list.
- Get Results – this will load the RAIL report on species you chose found in the area you drew. Click on FILTER RESULTS button at the top of the report to filter species by a variety of characteristics. Click on the expand button at the right side of any row to get full description about this species, including PIF population estimates, physical characteristics, habitat, biology, conservation status, picture, distribution map, and AKN phenology graph.
About the RAIL tool – For more information on the underlying data sources and analysis assumptions, see https://avianknowledge.net/index.php/about-rail/.
Using the Analyst Tool
- You must have an AKN account and have been granted access as a Project Leader to use this tool. It is also important to note that data must be saved higher than sharing level CLEAN to be used in the Analyst tool.
- Log into the AKN as an Analyst.
- Select the type of data you will be analyzing.
- Select the project(s) you want to analyze data for, you can analyze data for multiple projects at once.
- At the top you will see “Groups”, this likely does not apply to your project and can be left blank.
- Under Step 2, select the sampling units you would like to analyze. If the project contains a large amount of data not all tools will run, if this occurs you can limit your data by selecting a lower level of sampling unit (or changing other criteria).
- Step 3 choose the criteria such as date range for the data you would like to analyze. Distance is automatically set to be within 50 meters and Flyovers are set to be excluded, both of these settings can be changed.
- You can leave the Select Groups blank unless this pertains to your project.
- Select either All Species or the species you would like to analyze, you can select more than one by holding the Shift key.
- Select the type of Analysis you would like to run.
AKN Glossary for DoD
The following Glossary can also be downloaded HERE.
Users access levels (Note: to obtain any level of user access in the AKN, you must first register for a user account. Please visit https://www.dodakn.org/new-users/ to find your project name and create a new user account.
The AKN allows for multiple levels of access to enter, manage, and share data. AKN users are assigned a User Role associated with each AKN Project they have permission to access. Current User Roles include:
- Biologist: An AKN user assigned as a Biologist in an AKN Project can enter and proof data. Biologists can also review, edit, or correct previously entered data in any dataset housed within the AKN Project.
- Project Leader: In addition to all Biologist User Role capacities, AKN users assigned as a Project Leader in an AKN Project can assign Sampling Protocol Definitions to an AKN Project, manage the Sampling Units (areas, points, transects, etc), manage data, get full exports of the AKN Project data from the system, and manage the User Roles (Biologist or Project Leader) of other AKN users on the AKN Project. Project Leaders can also set the desired data sharing levels for data, which determines how the data will appear in the various tools in AKN.
Data Management Terms

- AKN Project: Fundamental unit of organization for observation data within the AKN. Projects contain information about how (Sampling Protocols), who (Researchers and Users), where (Sampling Units), when (Sampling Events), and what (Sampling Event Observations) data are collected. For DoD, each installation has its own project.
- Sampling Unit: Field location where research or a survey is conducted and samples (observations) are collected. Sampling units are arranged hierarchically within AKN Projects (e.g. point count points nested within a transect). Sampling Units contain a location name and geometry that describes where it sits on the earth. All point, polygon and other geographic data are described in WGS-84 Latitude-Longitude (EPSG:4326) geographical coordinate system.
- Researcher: A person’s name stored in the AKN assigned to a Project(s) by the respective Project Leader(s) and is identified with collecting observations. A Researcher does not have an AKN user account and therefore cannot enter or proof data, but an individual who is registered either as a Biologist or Project Leader can enter data on behalf of the Researcher under the researcher’s name.
- Sampling Protocol: Defines how the data were collected and how they are stored. This includes extended field names, domains, and any rules built into the data structure.
- Sampling Event: Represents the survey itself with a unique combination of location, date and time, person/people, and the protocol employed.
- Sampling Observation: Observations made at a sampling event; these observations will differ depending on the specific AKN protocol being used, but will contain some core fields such as species and count.
Sampling Protocol Types
- Area Search: An observer records all the birds detected (often with other behavior characteristics) within a specific boundary in a recorded period of time. Area search protocols include start and end times, the species observed, and can also include a count, detection cues, or breeding behaviors. Area search protocols are flexible and can be adapted to a wide variety of surveys, and are often used to enter comprehensive species checklists. Unless specified, the protocol is assumed to be an exhaustive survey of all species.
- Point Count: An observer records all the birds detected (often including other behavior characteristics) from a series of known, fixed locations, surveying each location for a set period of time. Point count protocols include the duration of the survey, how the time is binned, and often include distance (binned or exact), detection cues, or breeding behavior. Unless specified, the protocol is assumed to be an exhaustive survey of all species and that each animal is counted once.
- Linear Transect: An observer moves along a path recording all the birds detected (often with other behavior characteristics) along the way in a recorded period of time. Linear Transects are done either on foot or in a vehicle (airplane, boat, etc). Unless specified, the protocol is assumed to be an exhaustive search of all species.
- Secretive Marshbird: Secretive Marshbird protocols follow the Conway National Protocol Framework for surveying species at points using a predefined playback sequence
- Site Conditions: Site Condition protocols are used in conjunction with another protocol type (Point Count, Area Search, etc_ for recording covariate characteristics about the landscape at or around a sampling location at a give date and time. Site condition fields apply to the entire sampling event, not just a single observation or record and can include fields such as weather conditions, vegetation cover, and disturbance. Site conditions protocols can be applied to multiple projects if desired.
Data Sharing Levels: Each observation available in the AKN is tagged with a data sharing level as determined and set by the data owner (project leader). The AKN provides multiple data sharing levels (full details can be found on the Data Sharing Level page.
Core fields: Fields that are automatically associated with a protocol, either in the event or observation table. Some core fields are required (i.e., set by the AKN) and others are not and can be suppressed so they do not show up on the user interface. Example core fields that are required are species and count.
Extended fields: Custom fields that are specific to your database. Extended fields may apply to a site condition protocol or an observation protocol. Once created, extended fields can be used in multiple protocols within the same protocol type (e.g. area search, point count). Extended fields are included in the project warehouse and will be part of the data downloaded through the Project Leader application, but will not be included in the AKN tools such as the Data Downloader or the Analyst.
Project data: Project data includes all the data as you entered it into you project. This includes all extended fields, the original distance bins, etc that are included in the protocol you use.
Warehouse data: Warehouse data has been formatted to fit a standard format that allows for data collected with different protocols to be analyzed together. Warehouse includes all core fields (e.g., species, count, time) and some “smoothed” fields. For example, distance bins are replaced with averages of the range of the bin to make the data comparable with protocols that record exact distance. Extended fields are not included in warehouse data.